New site is: http://edt-text-editor.sourceforge.net/ |
|
|
Edt contains four built-in buffers:
The editor maintains one level of back-up for any file edited so you can always revert to the previous version even in the unlikely event of a save error. The editor maintains continuous journaling for error recovery down to within a few keystrokes, in the event of a system failure during an editing session.
Type:
edt file_nameThe editor contains two modes:
The line-mode and screen mode operations are elaborated below. Additionally, there are several command-line options that can be used when invoking the editor, such as:
	-readonly
	-crypt
(These modes can be used in combination with each other.)
When the -read_only or -read command-line option is placed anywhere on the command-line when the editor is invoked, then the editor will be placed in a read-only mode. In read-only mode, the editor will not allow modification of the original file by way of an exit and save to that file. This is helpful when you need a powerful viewer, but want to avoid accidental changes to an important file. If you attempt to save from readonly mode, you will be reminded that you are in readonly mode and cannot save. If you however want to preserve your edits anyway, you may write to any arbitrary file name using the w write to file-name command.
When invoked in the -crypt mode, the editor will ask for a unique encryption key, or password, used for encoding and decoding the document when stored as a file. This is useful when creating sensitive material, since at no time will the sensitive text appear in ascii format on the disk system. Be cautious in selecting a password key that you can remember, because there is no way to edit an encrypted document without the exact key.
The editor checks the size of your viewing window upon entering screen-mode. If you should change the window size during an editing session, you should notify the editor by going to line-mode and back to screen-mode, EDt will automatically establish new size parameters. You can also set the size parameters explicitly, if needed, to arbitrary values by using the "set rows/cols" commands described below.
To move around, use the arrow keys or keypad "jump"/"search" keys.
Note that the editor considers the text buffer to be a single linear string of characters which are wrapped across the screen to form lines of characters. Therefore, you can move to the end of the previous line by hittingTo delete characters backward use the delete key.until the beginning of the current line is reached. You can likewise exploit this same property for joining lines by deleting the intervening carriage-return, or breaking lines by inserting a carriage-return, etc..
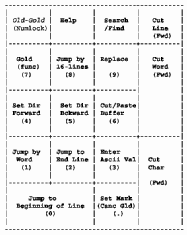
| Gold | - | This key selects the second function of many of the keypad keys. Defined as key-"7" on newer keypads. (On older systems, the upper-left-most key was traditionally the gold key. However, many newer systems have a hardware-implemented num-lock key in that position which does not produce a key input. Consequently, the gold-key has been moved the 7-key directly below.) |
| Help | - | Displays this help file. |
| Search/Find | - | Use the key
as follows: To enter a search string, hit the <Gold> <Search> keys. This will bring up an entry area at the bottom of your screen for typing in your search string. The search string can contain any type of characters, including <carriage-return> and non-alpha-numeric characters such as punctuation etc.. Upon completing the search string, initiate the search by hitting the <Dir-Frwrd> or <Dir-Bckwrd> key-pad keys according to which direction relative to the cursor you want to search. To search (ie. again or repeatedly) for the current search string, simply hit the <Search> keypad key. |
| Delete-Line-Forward | - | The
<delete-line> key deletes the remaining characters on the line
from the cursor position to the end of the line, including the
<carriage-return>. The deleted characters are held in the
"delete-line-buffer".
<Gold><delete-line> pastes the characters held in the "delete-line-buffer" to wherever the cursor is. This can be used to undo an accidental deletion, or to replicate. |
| Delete-Word-Forward | - | The
<delete-word> key deletes the remaining characters in the word to
the right of the cursor. Words are delineated by the white space
characters: <space>, <tab>, and <carriage-return>. The deleted
characters are held in the "delete-Word-buffer".
<Gold><delete-Word> pastes the characters held in the "delete-Word-buffer" to wherever the cursor is. This can be used to undo an accidental deletion, or to replicate. |
| Delete-Char-Forward | - | The
<delete-char> key deletes the character to the right of the
cursor. The deleted character is held in the "delete-char-buffer".
<Gold><delete-char> paste the character held in the "delete-line-buffer" to wherever the cursor is. This can be used to undo an accidental deletion, or to replicate. |
| Jump by 16-lines (keypad 8) | - | The <jump-page> key moves the cursor position by 16
lines, either up or down based on the current direction setting.
You can use this key to scroll through a document quickly.
<Gold><keypad 8> re-formats a selected text region to the current margin width. The margin setting defaults to 65, and can be set using the set margin command-line command described above. |
| Jump by Word (keypad 1) | - | The <jump-word> key moves the cursor either right or left
based on the current direction setting. This helps to quickly move
to a position within a line.
<Gold><jump-word> = <change-case> , reverses the capitalization of the character to the right or left of the cursor according to the direction setting. If the cursor is positioned at the start of an instance of the current search-string, then the capitalization of that instance of the search-string will be reversed. Or, if there is a selection region active (see Set-Mark), then the capitalization of the selected region will be reversed. |
| Jump to Begin of Line (keypad 0) | - | The <jump-BOL> key moves the cursor to the first character of the next line if the direction is set to forward, or to the first character of the current line if the direction is set to backward, unless it is already on the first character in which case it moves to the first character of the previous line. The key can be pressed repeatedly to move through a file. |
| Jump to End of Line (keypad 2) | - | The |
| Enter character as ASCII Decimal Value (keypad 3) | - | This key is useful when you need to enter an ASCII value which you do not have a key for, such as non-alpha-numerics. For instance, to insert a <control> value into a file, such as <cntrl-G> , you would hit <keypad-3> , an entry window at the bottom of your screen prompts you for the ASCII value, which for <control-G> is "7", then you hit <keypad-3> again, and the ASCII value is inserted into the file. |
| Set Direction Forward (keypad-4) | - | This key sets the direction of many of the other keypad
functions to forward, such as jumps and searches. Once set, the
direction remains, until changed by the <set-direction-backward>
key.
<Gold><set-direction-forward> moves the cursor to the very end (or bottom) of the file. |
| Set Direction Backward (keypad-5) | - | This key sets the direction of many of the other keypad
functions to backward, such as jumps and searches. Once set, the
direction remains, until changed by the <set-direction-forward>
key.
<Gold><set-direction-backward> moves the cursor to the very beginning (or top) of the file. |
| Cut/Paste (keypad-6) | - | This
key cuts a selected section of text from the file, and places it
into the paste-buffer. Note that the cutting action only occurs
when a marker has been set and is valid. (See the <Set-Mark> key.)
This can be used to put text into the paste-buffer for
<search/replace> operations. (See <search/replace> key.)This
can also be used to cut very large regions from a file. For
instance, you could set a mark on line 30,000, move to line 60,000
and perform the cut to remove 30,000 lines. This is much faster
than using <delete-line>.
<Gold><paste> pastes the contents of the paste buffer into the file at the location of the cursor. This can be used to undo an accidental cut, or to replicate sections of text many times. |
| Set Mark (keypad ".") | - | This key sets a marker in the file corresponding to the current cursor position. The cursor can then be moved by any of the movement commands, such as arrow-keys, jump-keys, search-keys, or direct line number command. When moved, the text between the cursor and the marker defines a selection region that can be operated on by various other keys, such as the <cut/paste> key, the <reformat> key, or the <change-case> |
| Replace (keypad 9) | - | If the cursor is positioned at the start of an instance of the current search-string, then the instance of the search-string will be replaced by the contents of the paste-buffer when you hit <replace>. If <Gold><replace> is used, Then he search function will be automatically invoked after the replacement to position the cursor at the next instance of the search-string if there is one. |
| c | - | Go into full screen editor mode. |
| q [quit] | - | Quit from editor without saving file. You are asked to confirm this command if you modified the file. |
| ex [exit] | - | Exit from the editor and save the edited file. The previous version of the file (if it exists) is moved to a file of the same root name but with a .bak suffix just prior to the save operation. This provides a backup file. |
| w [write] | - | Writes a copy of the edit buffer to a named file. Example: write doc.txt |
| r [read] | - | Same as include. |
| incl [include] | - | Brings contents of named file into the active edit buffer.
The new contents are inserted at the current cursor position
as if they were typed in. Example: incl data.txt |
| s [substitute] | - | Perform character string substitution. Example: s/string1/string2/ Searches for all instances of string1 and replaces them with string2.
Note that any non-alphanumeric character can be used as the delimiter,
but the same one must be used in all three positions.
This allows you to search for and replace strings containing any delimiters. |
| case | - | Toggles case sensitivity for searches and search/replace. The default is case-insensitive. |
| resize | - | Resets the editor's window row and col size parameters according to the current window size. This is useful when the size of the viewing window is changed. (This old function is no longer needed.) |
| set rows | - | Sets the editor screen mode to display the specified number of rows. Example: set rows 24 |
| set cols | - | Sets the editor screen mode to display the specified number of
character columns. Example: set cols 80 This sets the screen to display a maximum of 80 columns. |
| set margin | - | Sets the right margin parameter, used by the re-format operation,
to a specified number of columns. Example: set margin 65 See re-format key-pad operation below. |
| encrypt | - | Toggles encryption mode. |
| <line number> | - | Typing a number at the line prompt moves the cursor to that line number. The line and number are displayed. |
| ! <Unix command> | - | The exclamation mark can be used to escape to a Unix
command without leaving or exiting from the editor.
This is useful for listing directories, etc.. Example: ! ls -la file |
| = <buffer_name> | - | Switch text buffers. The default buffer is called "main".
You can give any arbitrary buffer name to create a new buffer.
You can switch between them at any time by naming them after the equals sign.
Be careful at "saving" / "file-writing" - time however. Only the contents of the currently active buffer will be saved. (If you are not in the main buffer, Edt will warn you.) |
| list | - | Lists the names of the currently defined text buffers. |
| configure_keypad | - | Enables you to acquaint Edt to your keyboard. Key-pad keys on different platforms send varying key-codes. To configure the editor to your key-pad when first installing, invoke the editor and type configure_keypad at the prompt. The editor will then prompt you to press each of the key-pad keys. It will record the code sent by each key, and enable you to save the configuration to a set-up file. |
Warning: EDT_KEYPAD_SETUP not set. (Type help_config.)Typing help_config will produce the following instructions.
When first installing EDT, the key-pad configuration procedure should be run to acquaint EDT with your particular keyboard. This process makes the '.edt_rc' file that EDT references when starting all future sessions.
To run the configuration procedure, at the editor's prompt, type:
configure_keypadIt will lead you through a set of instructions involving pressing the keypad keys. When complete, it will store the configuration file as '.edt_rc'. The editor will rely on the environment variable:
EDT_KEYPAD_SETUPto point to that file on future invocations. We recommend moving the .edt_rc file to your main directory, and placing a line in your .cshrc or .bashrc file to set the variable automatically on future sessions.
If you have previously created the configuration, but get a warning when starting EDT that it cannot find it, and the keypad bindings do not take their functions, then the environment variable needs to be set to properly point to the .edt_rc file.
KeyPad Configuration: This is a two-step process. The first step finds the 'raw X-key-codes' of each of your key-pad's keys. It will be skipped if you are not in an environment where X-window calls can execute, such as a telnet window. Otherwise, a small (Xev) window will appear, and a list of keys to strike will be listed in the Edt window. Click your mouse on the Xev window and type the keypad keys exactly in the order listed. BE CAREFULL!!! What you type will affect your keyboard if you accept the changes. If you mess up, simply abort (it gives the chance to abort), and try it again. (Hint due to buffering, it is help to hit several extra spaces before exiting the Xev window.)
The second step learns the actual values returned by the keys. It asks you to press each of the listed keys, followed by Enter or Return. Again, do this carefully. If successful, you should save the .edt_rc file and set your EDT_KEYPAD_SETUP environment variable to point to that setup file for future editing sessions.
To recover from a journal file, restart the editor on the edited file as before, but with the input directed from the journal file. You will see the editing session replayed.
Example:
Suppose in your directory there is a file called "text.doc":text.doc Jun 6 1978 8:02You begin editing the file " text.doc" by typing:ed text.docAn hour into your editing session, the system crashes at 10:37 AM.Upon resumption, you would notice there are two files:
text.doc Jun 6 1978 8:02The first file contains the original contents of the " text.doc" file prior to the crashed editing session. The " text.jou" file contains a record of the edits made during the recent session.
text.jou Jun 7 1978 10:36To be safe, make a copy of the journal file:
cp text.jou text.recoverYou can now recover the edits from the interrupted editing session as follows:Begin the recovery process by editing the "text.recover" file to put a control-Z and "exit" at its end so that the file will be saved upon recovery.
Specifically:
Now execute the recovery file by typing:
- enter screen mode ( c ),
- go to the end of the file (gold 4),
- hit space and return,
- enter the control character ctrl-Z by hitting in sequence:
gold(26 is the ascii value for ^Z.)
3
26
gold
- enter "ex" after the ^Z. This will cause an exit and save the document when you execute the recovery file.
- save and close the recovery file.
ed text.doc < text.recoveryYou will see the replay of your editing session and the editor will save the final version and close.
Each package contains two files:
alias ed /home/bart/stuff/edt_1.3Example, for Bash shell, place the following into your .bashrc file:
setenv EDT_KEYPAD_SETUP /home/bart/stuff/.edt_rc
alias ed=/home/bart/stuff/edt_1.3Then invoke, for example, as: ed myfile.txt
export EDT_KEYPAD_SETUP=/home/bart/stuff/.edt_rc
If the default .edt_rc file does not match your keypad (your keypad keys don't work properly), then you may need to either modify your .edt_rc file, or run the configure_keypad procedure from the editor's line-mode. See above.
Bugs - A few minor and new functions should still be implemented, such as, delete word+line backwards, and a new command to write the paste-buffer itself directly to a file without needing to paste it to a text-buffer. A method to highlight selected text is still needed, but the selected text works even though it is not highlighted.
Authors - The screen handling sections were originally written by Eric Elisney, Dean Henlason, and others.
The Edt features and personality were later enhanced by Aston Krumheuer and Jay Chamberlain.
Major sections were ported to Unix by Robert Pesch.
This version maintained by admin@csim.com.