Csim

Digital Logic Models Library

The Digital Logic model library of CSIM contains several simple elements for modeling digital logic circuits. This document describes the models and how to use them. The Digital Logic models are located under $CSIM_MODEL_LIBS/digilogic. Several example simulations are also included under the examples subdirectory.

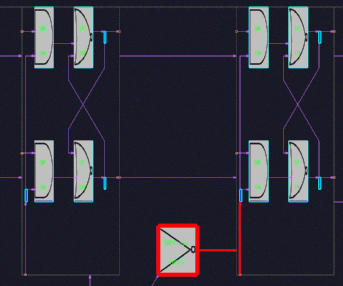
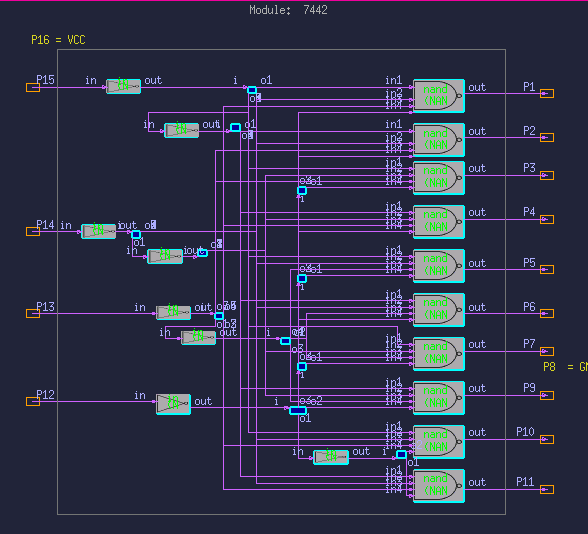
Although the models are useful as-is, they are also considered as examples for how to model digital logic elements. The base models can be extended or simplified as needed.

To use these models, include (by-reference) $CSIM_MODEL_LIBS/digilogic/Library.sim in your top-level diagram.

Digi-Logic models are provided at several abstraction levels.

  1. Simple Logic Gates - (And, Or, Nor, Nand, Not, etc..)
  2. Modules of Logic Gates - (FlipFlops, Adders, etc..)
  3. Standard Parts Models - (74xx Series, USARTS, etc..)
  4. Convenience Functions - (Clock, TestBench, Converters, etc..)
  5. RTL (Register-Transfer-Level) Blocks - (ALU, Register file, Memory, etc..)
The first three levels operate with binary 0/1 values. (Unknown or hi-Z is represented by -1.) The third level operates on both binary and integer values. The integer values merely represent parallel collections of binary values, but are more efficiently modeled as a single value. The fifth level primarily deals with the integer abstraction, but can easily interface to the binary levels through conversion functions in level 3. The fifth level is not comprised of gate-level models, but represents larger blocks of logic somewhat more abstractly through functional/procedural behavioral descriptions.

  1. Gate Models
    On the lowest level are the simple on-bit logic gate models:
    • Not
    • And
    • Nand
    • Or
    • Nor
    • Xor
    • XNor
    The And, Nand, Or, and Nor gates handle any number of inputs (eg, 2, 3, 4, etc..). (Thus there is no need for separate variant models such as Nand_2input, Nand_3input, etc., keeping the library simple. However, a Nand_2in and Nor_3in are provided for curiosity.)

    All the simple logic gates have two parameters: Inertial Delay and Propagation Delay. These are defaulted to 0.01 and 0.09, respectively. The defaults may be overridden globally under Edit/Variable in the GUI, and/or on a module or instance basis under the object's properties dialog.

    Inertial Delay is the amount of time that an input must be stable before it can affect an eventual output. It basically dampens transients. It is analogous to the similar property of actual logic gates, and is the same as the Inertial-Delay quantity in VHDL. For example, suppose both inputs of an or gate have been zero (low), and a spike of infinitesimal duration raises and lowers one input. Without inertia, the spike would appear on the output after the propagation delay. However due to inertia, the spike will not appear on the output. (You can set this property to zero, if not wanted, but the transient-dampening effect benefits overall simulation speed.)

    Propagation Delay is the time-delay for an output to appear after the inertial delay for an input change. In VHDL, this is called the Transfer-Delay.

  2. Basic Function Models
    Next there are a number of convenient circuit modules built out of the simple logic gates:

  3. Standard Part Models
    A library of standard chips has been initiated. See 74xx-Series Logic Family. It contains approximately 64 models presently and will be grown with time. Most have been tested, though not validated for timing against a specific family or speed grade (ie. ttl, nmos, cmos, etc..). However, they can be parameterized to reflect any of these. The test-benches and test-vectors are provided for the non-trivial circuits, as indicated in the referenced document. Validation status is also indicated. (Remember this is a brand new library!)


    Example -7442.sim

  4. Convenience Models
    Next there are a set of convenience models:


Usage:

As an example, we will follow the process of constructing and testing the Master-Slave FlipFlop module.
  1. First, open the GUI:
            gui
    and import the digilogic library by reference:
            File / Import / By Reference
                    $CSIM_MODEL_LIBS/digilogic/Library.sim
  2. Next, draw the circuit diagram of our design. If you were starting from scratch, you might start by configuring an RS-flipflop module as shown below.
    However, in this case the Master-Slave FlopFlip and all constituent pieces are already part of the library. So we only need to draw the top-level diagram, as shown below.
    Notice that we instantiated the MS-FlipFlop and added a TestBench. The TestBench was then connected to apply the necessary input signals, and to record the output signals from the MS-FlipFlop, which is the Unit-Under-Test (UUT). By convention, the port-names of the signals connected to the TestBench are given the same names as their connections to the UUT. But you can give them any meaningful names. These are the names that will be used to identify the response signals in the output plots. And these are the names that are used in the VectorStimFile to reference the links to apply signals to. Finally, set the TestBench's VectorStimFile parameter to the file name we will use: test_msff.dat .
  3. Now, create the VectorStimFile. We'll call the file:
           test_msff.dat
    In this file, we will want to set the UUT's input ports to valid values, and then toggle them through a pattern that will test the unit.
    Here is an example.:
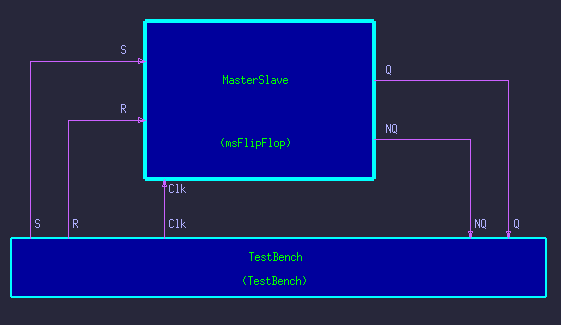
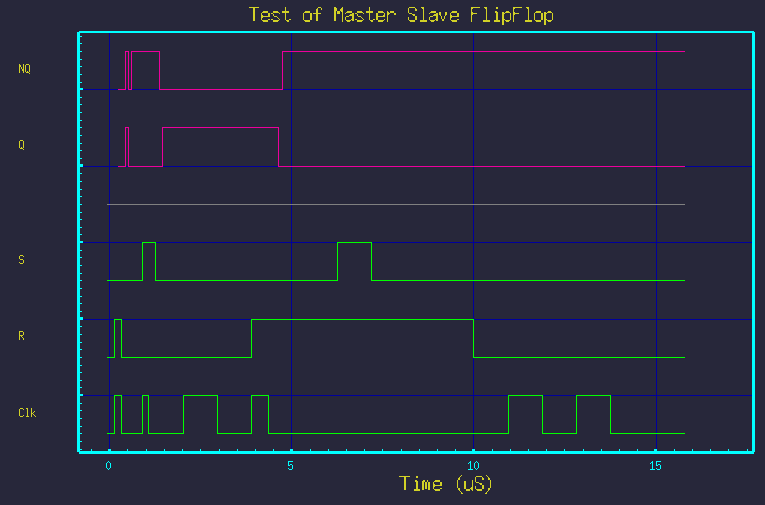
    	Title = Test of Master Slave FlipFlop
    	delay 1e-20	! Small initial delay assures all models are ready.
    	 Clk 0		! Zero out the inputs initially.
    	 R 0
    	 S 0
    	delay 0.2	! Wait a small time.
    	 R 1		! Apply reset and clock pulse.
    	 Clk 1
    	delay 0.2
    	 R 0		! Lower reset and clock.
    	 Clk 0
    	delay 0.6
    	 S 1		! Apply Set and clock pulse.
    	 Clk 1
    	delay 0.2
    	 Clk 0
    	delay 0.2
    	 S 0
    	delay 0.8
    	 Clk 1		! Toggle clock to see that values are held.
    	delay 1
    	 Clk 0
    	delay 1
    	 R 1
    	 Clk 1
    	delay 0.5
    	 Clk 0
    	delay 2
    	 S 1		! Try toggling Set and Reset when clock is low,
    	delay 1		!  to see what happens.
    	 S 0
    	delay 2
    	 R 1
    	delay 1
    	 R 0
    	Mark Red	! Mark the end of the main test.
    	delay 1
    	 Clk 1
    	delay 1		! Let the clock run out ...
    	 Clk 0
    	 S 0
    	 R 0
    	 R 0
    	delay 1
    	
  4. Build and Run the simulation.
            Tools / Build Simulation
            Tools / Run

                    (Click Run button. Watch simulation to end. Click Exit.)
    During the simulation run, you may watch by setting the animation modes of links and boxes to type 1. (Default is no animation, for speed.) You may also wish to flatten portions (or all of) the hierarchy. If you do this for the Master-Slave Flipflop, you might see something like this:
  5. Finally, plot the simulation results:
            xgraph measured.dat
    You will then see:
    The bottom-half of the graph shows the applied stimulus signals versus time in green. The upper-half, above the gray dividing-line, shows the response signals from the UUT in violet.


Back Up to Model Libraries