VPT Scenario Entry Tool (S.E.T. or ScenGen)
Contents:
|
1. Introduction 2. Invocation 3. Usage 4. Configuration 5. Other Options |
|
1. Introduction
The Scenario Entry Tool, ScenGen, provides a graphical way to enter way-point scenarios relative to native map coordinates and Day:Hour:Minute:Second times. Way-points are a crucial aspect of mission plans and scenarios.
The scenario generator can capture and review the positioning and movement plans of multiple independent vehicles across multi-phase or multi-day missions. It records all information in XML format. It can be used to review, edit, or play-out earlier entered scenarios.
2. Invocation
Invoke with: scengen(Can be typed into command-line or clicked under GUI / Tools menu.)
The Scenario Editor Tool will open to its opening screen as shown below.
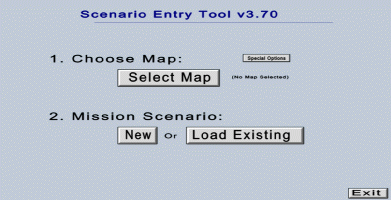
Opening Screen
From this screen, you can load an existing map-setup or create a new one, by pressing the appropriate buttons. Once you have selected or created the map to use, you can open an existing scenario or create a new one. (Example files are in the $CSIM_MODEL_LIBS/vpt/scenarios directory. For initial learning, copy these files to your local directory.)
- Selecting Map - The background map-image and coordinate-ranges are stored in a map-geometry file.
By default S.E.T. will look for these data in a directory called Maps.
(There is an example map in the $CSIM_MODEL_LIBS/vpt/scenarios directory.)
You select the map-file to use by clicking the Select Map button.
A file-browser will let you choose a map-setup file.
Or, you can create a new map-setup file by clicking the Select/Set-up Map button. A pop-up will let you browse for a map-image-file, let you enter coordinate ranges, and save these configurations to a new map-setup file-name. Note that you can download map images from many sources on the web. You can also draw your own maps with a drawing tool and export their images. JPEG, GIF, and PPM are acceptable image formats for the map-image.
- Opening New or Existing Way-point Tracks -
Next you can select to create a new scenario by clicking the Create New Scenario button, or
you can open a previously saved scenario by clicking the Load Existing Scenario button.
If you click the latter, a file-browser will pop-up for you to select the scenario file.
Scenario files contain way-point tracks or traffic data. (There is an example
tracks.dat file in the $CSIM_MODEL_LIBS/vpt/scenarios directory.)
Once you have made the selections, S.E.T. opens the map scenario screen, where you can enter, edit, delete, or review way-point scenarios.
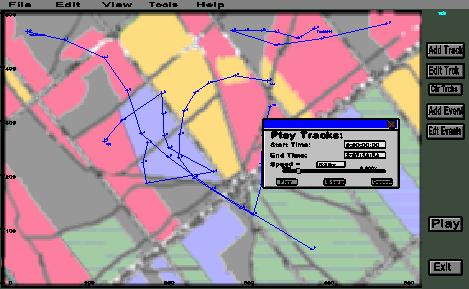
3. Usage
To generate new traffic scenarios, click the "Add Tracks" button (formerly "GenPath") on the upper right side of the display. It will pop-up a window with three radio-buttons at the top. The choices are:
- Explicit - This mode lets you enter a specific track trajectory to occur at a specific time. You select a vehicle type, and then enter times and click points on the map for each waypoint along the trajectory. (The velocities to reach the waypoints in the specified times are automatically calculated and displayed.)
- Random Corridor Traffic - This mode lets you enter corridors for random background traffic. Tracks will begin at random times within specified time-span, and traverse a pathway that you click on the map, at the velocity you specify.
- Area Rand - This mode lets you define a rectangular area in which the named vehicle will wander randomly at a specified velocity during the specified time.
Next, select a track (vehicle) type. Presently, the options are Own-Ship, Surface Unknown, Surface Friendly, Surface Hostile, Air Unknown, Air Friendly, and Air Hostile. Your selected track-type will be displayed in bold.
Next, enter a unique track name (or class name).
The following panel items will vary depending on which type of path you selected to generate at the top.
- If you selected an "Explicit" path, then you can either set
a velocity and the way-point times will be calculated for each
point on the map you click in sequence, or you can enter a time
for each way-point clicked, and the velocity will be calculated.
Select the mode with the toggle button next to the way-point
counter. It will display the currently selected mode.
Either way, you must first enter a time for the first way-point.
It must be entered as:
Day:Hour:Min:Sec
Example: 0:0:45:20.2
Then click on the map where you want the first way-point to be. Next, enter a time for the second way-point, and then click on the map where it should be. The scenario generator will automatically calculate the velocity needed to reach the way-point from the distance and time from the previous way-point. Continue entering times and clicking points until done describing the track's/vehicle's path. Then click the "Done" button. It will write or append the entered path to the scenario file, "traffic.dat". You can then add more tracks to your scenario by clicking the "GenPath" button and repeating the process. - If you selected a "Random Traffic" path, then you must first
enter the times (T-start, T-end) during which the random
traffic will be generated. Next, enter a velocity and a mean
inter-arrival period (mean time between new tracks). Then begin
clicking on the map. The first click sets the coordinates of the
starting-point of all tracks generated on this path. You will
see the coordinates entered in the "From" coordinates area.
The next click will set the next way-point along the path.
You will see the coordinates entered in the "To" coordinates area.
Subsequent clicks will enter new way-point path segments.
When done entering a path, click the "Done" button. It will
write or append the entered path to the scenario file,
"traffic.dat". You can then add more tracks to your scenario by
clicking the "GenPath" button and repeating the process.
- If you selected an "Area Rand" path, then you must enter the
times (T-start, T-end) during which the wandering maneuver will
occur. Next enter the velocity. Then drag a box on the map
around the area where the track is to wander. Finally, clicking
'Done' will generate the random trajectory and write or append
it to the "traffic.dat" scenario file.
Editing, Hiding, or Moving Individual Tracks
You can edit, show, or hide tracks by clicking near any vertex of a track.
Tick-marks will appear on the track, and the track name will be identified in green at the upper right of the display.
Double-clicking a tickmark will bring up the track editor on that track.
In the track-editor window, you can change many aspects about the track, such as its type, or whether it is displayed or not.
Under the Tools menu, you can switch the Mouse Ident mode to Drag with Mouse. Then you can move tracks by dragging their vertices with your mouse. You can use this to adjust way-point positions graphically.
Zooming, Panning
When first invoked, the map is zoom-out all the way, so you cannot pan. By clicking the zoom-in button, you can zoom into smaller
regions of the map. Once zoomed-in to any degree, you can pan with the slider buttons on the side and bottom of the map.
Playing Traffic Scenarios
You can play scenarios by selecting the Play button. The Play dialog will pop-up.
You can enter a time-range to view and a relative play speed. Play speed can be entered by moving the slider, or by typing a value into the form-box.
When ready to play, click the play button. You will see the objects move, and time advances will be displayed on the right panel.
You can close the play-dialog to hide it, without stopping the action.
While playing a scenario, you cannot pan or zoom the map. Stop playing by clicking the stop button. You can then re-play for a different or total time-range, by repeating the above steps.
Units:
By default, velocities are to be entered in KM/Hour, or Nautical Miles per Hour (nm/h), also called nauts or knots (kts).
Times are to be entered as:
Days : Hours : Mins : Secs
Durations are specified in Minutes.
Saving & Clearing Scenarios:
Under the File menu, click "Save" to save the current scenario data.
Otherwise, if you exit without saving, any new track entries will be
lost. {In the near future there will be a warning popup.}
Presently, all scenario data is saved to the "traffic.dat" file by default. This is the same file it loads (by default) on start-up. Therefore, your entered tracks will append to previous entries. {In the future there will be a file-browser popup to save to SaveAs.}
If you wish to save the file aside, or clear it completely, to enter a fresh scenario, then rename or delete "traffic.dat".
An initial traffic.dat file is supplied for testing purposes. By default, new scenario tracks are appended to the existing traffic.dat file on save-out. When you re-open the scenario-generator, you will see your new tracks added to the old tracks.
To start fresh, erase the contents of the traffic.dat file. To save the scenario aside, rename the traffic.dat file to another name. To run the viewer from a different scenario file, rename it to "traffic.dat". {In the near future, the File/Import menu will open a file-browser to import arbitrary scenario files.}
4. Configuration
Map Configuration:
By default, the scenario-generator will read the "geom.dat" file for
definitions of the background map and object symbols.
Changing Map Diagram:
You can substitute alternate maps. The map is merely an image file.
For example, you may download map images of various world regions from
the with (with appropriate permissions) or other sources. Or you can
draw maps in PowerPoint and export as an image.
Example:
	==================================================================================
	| Define Map coordinates and screen position.                                    |
	|   Screen coords are in percent of screen.                                      |
	|     (left-top=(0,0), bottom-right=(100,100)                                    |
	|   Native map coords are usually KM, Nautical Miles, or Lat/Lon Degrees.        |
	==================================================================================

	<Map_Image  File = "Map2.pnm.scz" />

	<Map_Screen_Coords x1=0.3 y1=3.5, x2=90.0 y2=99.5 />

	<Map_Native_Coords x1=0, x2=500, y1=500, y2=0 />
5. Other Options
Making New Maps:
You can create and add maps of new regions by invoking the Map_Maker tool under ScenGen's Special Options menu.
See: How to Create New Maps.
Making Movies of ScenGen Sessions:
You can automatically capture movies of ScenGen sessions, such as for viewing
scenario play-outs, which can be included within presentations.
For details, see How to make movies from ScenGen sessions